
Guidelines and tips for achieving optimal results with Taika3D Capture scanning solutions.
Select your scanning method:
Essential preparation steps before you begin any scan.
Before scanning, open the app's App Store page and install the latest available version. On iPad, run the scanning app in full-screen mode because windowed mode can interfere with scanning.
Ensure both the sensor and the connected device (e.g., iPad) are fully charged before beginning a scan.
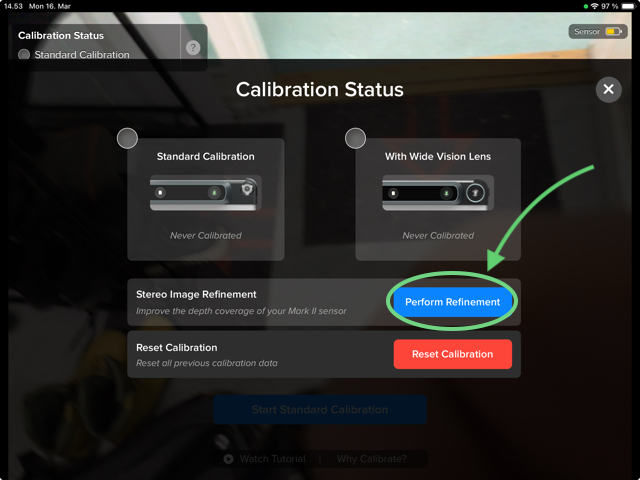
Calibrate the sensor regularly according to the manufacturer's instructions to maintain scanning accuracy. If using a Mark 2 sensor, please run the Stereo Image Refinement in the calibration app.
Oil, fingerprints, dust, and smudges on the sensor's glass plate can cause noisy depth data and tracking loss. Inspect and clean the plate before scanning, especially when tracking suddenly becomes unstable.
With TrueDepth scanning, you can get close to the limb and help the patient hold steady. See the Positioning section for recommended positions.
Get a comfortable hold on your iPad or iPhone. For iPads we recommend using a case with a strap or a handle for steady scanning.
Maintain a steady, controlled movement while scanning. Avoid sudden jerks or rapid movements that can cause loss of tracking. See Scanning Techniques for recommended movement patterns.
Before starting the scan, verify that the depth frame data quality is good. Compare your depth view against the examples below. Depth frame quality is crucial for accurate scanning results. Two major factors that affect the depth frame quality are lighting conditions and sensor calibration.
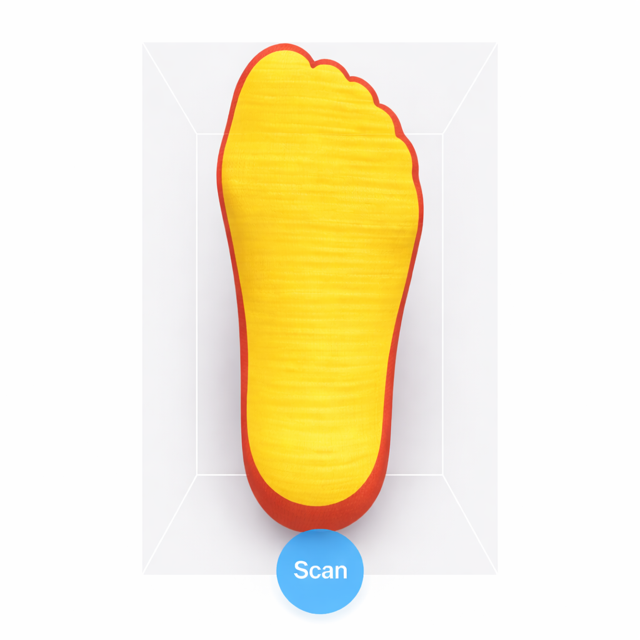 ✓ Good Depth
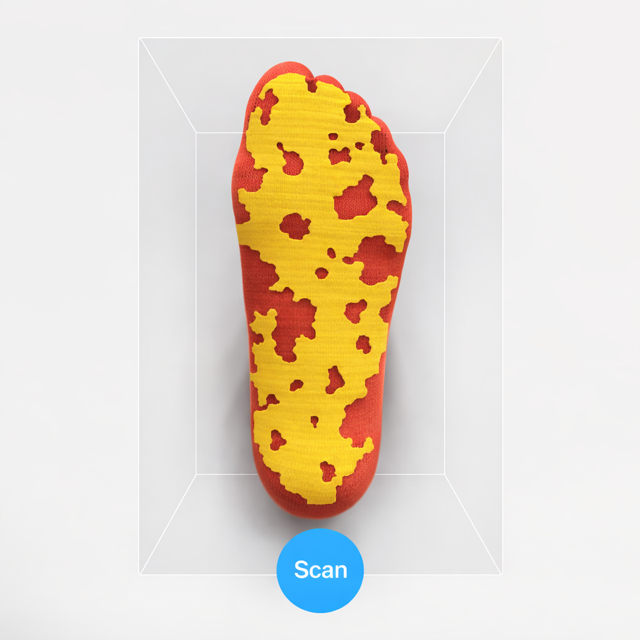 ✗ Bad Depth
Before starting the scan, verify that the depth frame data quality is good. Compare your depth view against the examples below. Depth frame quality is crucial for accurate scanning results. Lighting conditions, especially infrared interference, can adversely affect the depth frame quality.
✓ Good Depth
✗ Bad Depth
During scanning, the app displays status messages to guide you. Here's what they mean and how to respond:
The scanner lost its position. Hold the device still and return to a previously scanned area, or press reset to start over.
The subject is not registered as in view. This can occur when there aren't enough tracking pixels on the target. Even if the object appears on screen, the sensor may not detect it. Check and adjust the lighting conditions — switch to LED lights and avoid fluorescent or direct sunlight. Try the following: Move further away from the target. If this doesn't help, press reset to start over - adjust the bounding box to make sure it is properly set on the target.
The scanner needs a still moment to capture a color keyframe. Stop moving briefly until the capture completes.
The sensor is not detected or has low battery. Check the cable connection or charge the sensor before scanning.
Run the Calibration App or Structure App to resolve.
The sensor has become unresponsive. Disconnect the cable and reconnect it, then try again.
During scanning, the app displays status messages to guide you. Here's what they mean and how to respond:
The scanner lost its position. Hold the device still and return to a previously scanned area, or press reset to start over.
The subject is not registered as in view. This can occur when there aren't enough tracking pixels on the target. Even if the object appears on screen, the sensor may not detect it. Check and adjust the lighting conditions — switch to LED lights and avoid fluorescent or direct sunlight. Try the following: Move closer to the target. If this doesn't help, press reset to start over - adjust the bounding box to make sure it is properly set on the target.
The scanner needs a still moment to capture a color keyframe. Stop moving briefly until the capture completes.
Keep the optimal distance between the sensor and the subject. Distances vary between sensor models.
Keep the optimal distance between the device and the subject for accurate depth capture.
Remove unnecessary clutter from the scanning area that could interfere with tracking or obstruct the subject being scanned.
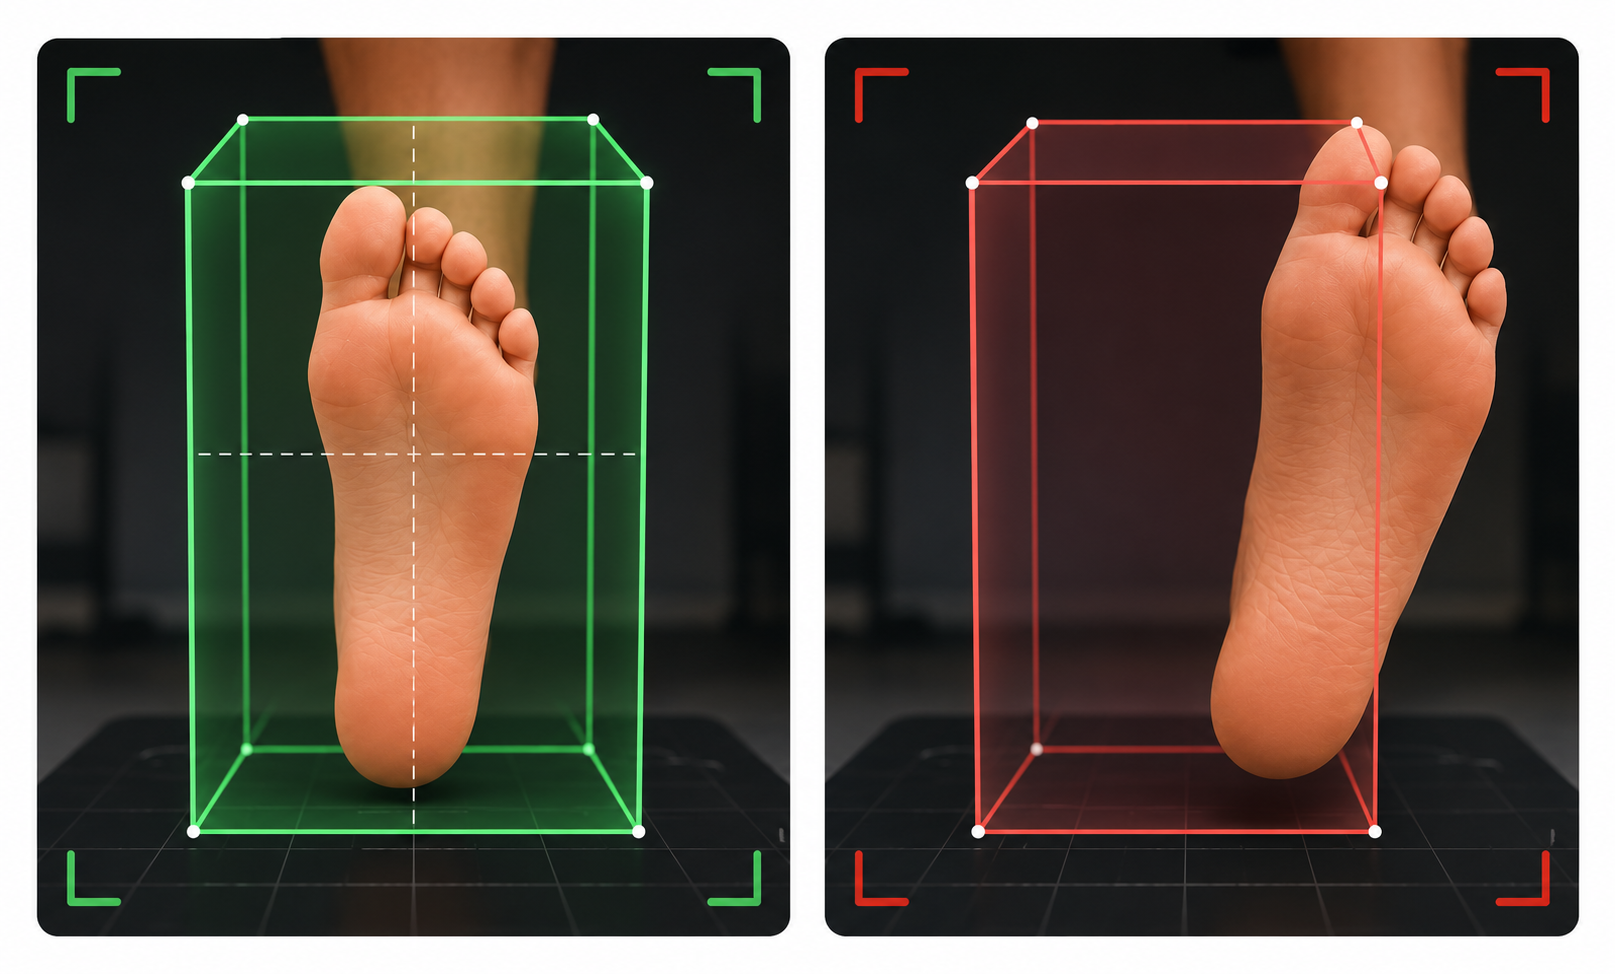
When placing the bounding box before scanning, ensure the object is centered inside the box with space on all sides. If you experience tracking issues or "model out of view" errors, increase the bounding box size to capture more tracking points around the subject.
Quick fixes for common issues encountered during 3D scanning.
Ensure the sensor is properly connected to your device. Check the cable connection, restart the app, and verify the sensor firmware is up to date using the Structure app.
Tracking loss can occur for several reasons. Follow these checks in order to diagnose and resolve the issue. For detailed information, see Structure.io support article ↗.
The subject is not registered as in view. This can occur when there aren't enough tracking pixels on the target. Even if the object appears on screen, the sensor may not detect it. Check and adjust the lighting conditions — switch to LED lights and avoid fluorescent or direct sunlight.Try the following: Move further away from the target. If this doesn't help, press reset to start over - adjust the bounding box to make sure it is properly set on the target.
The subject is not registered as in view. This can occur when there aren't enough tracking pixels on the target. Even if the object appears on screen, the sensor may not detect it. Check and adjust the lighting conditions — switch to LED lights and avoid fluorescent or direct sunlight.Try the following: Move closer to the target. If this doesn't help, press reset to start over - adjust the bounding box to make sure it is properly set on the target.
When using colored scanning mode, ensure you are stopping and capturing key frames at the end of each movement direction. Check that lighting is even and sufficient — harsh shadows or uneven light will produce inconsistent colors. We recommend using LED lights and avoiding fluorescent or direct sunlight.
Ensure your iPad has sufficient battery and free storage. Close other apps running in the background. If the issue persists, restart the device, check for app updates, and verify the sensor firmware is current.
Ensure your device has sufficient battery and free storage. Close other apps running in the background. If the issue persists, restart the device and check for app updates.
Set up the ideal scanning environment for best results.
Use LED lighting for the best scanning results. LED lights provide consistent, flicker-free illumination that produces best depth detection for 3D scanning.
Fluorescent lights can cause issues in depth detection, leading to inaccurate scan data, poor tracking and bad results.
Direct sunlight interferes with the infrared sensors used for depth capture. Always scan indoors and away from windows or other sources of natural light.
Position the subject correctly for comprehensive, accurate scanning.
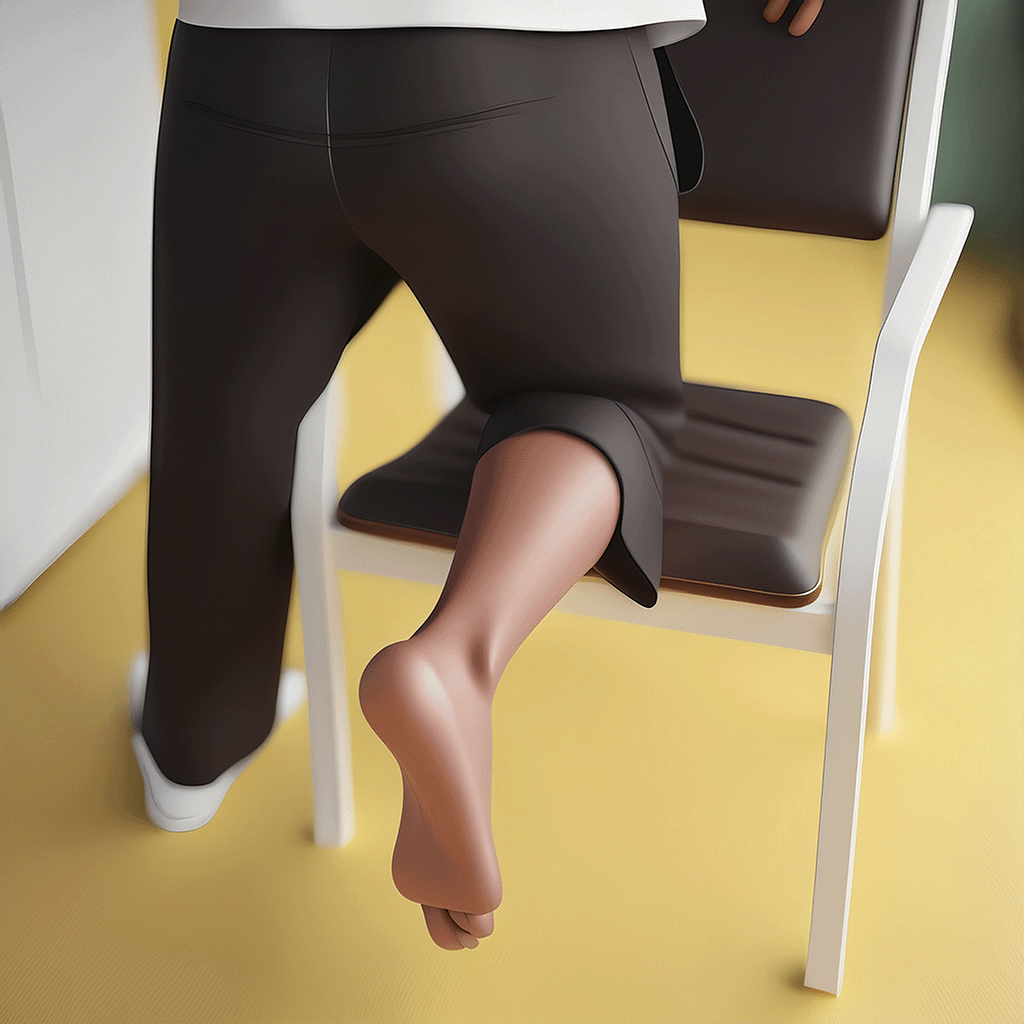
Patient stands next to a chair and lifts one foot onto the chair with toes pointing down.
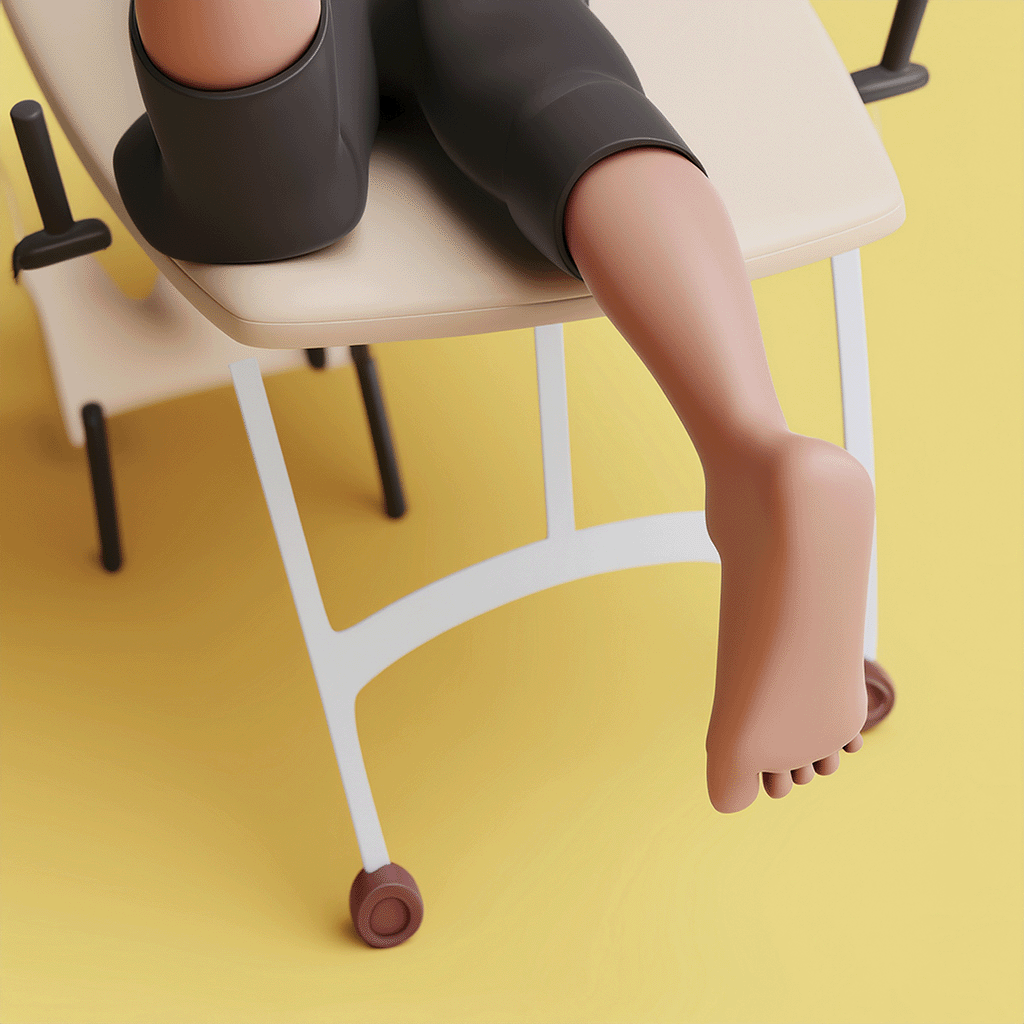
Patient lies face down on a bed or table with the foot hanging off the edge, toes pointing down.
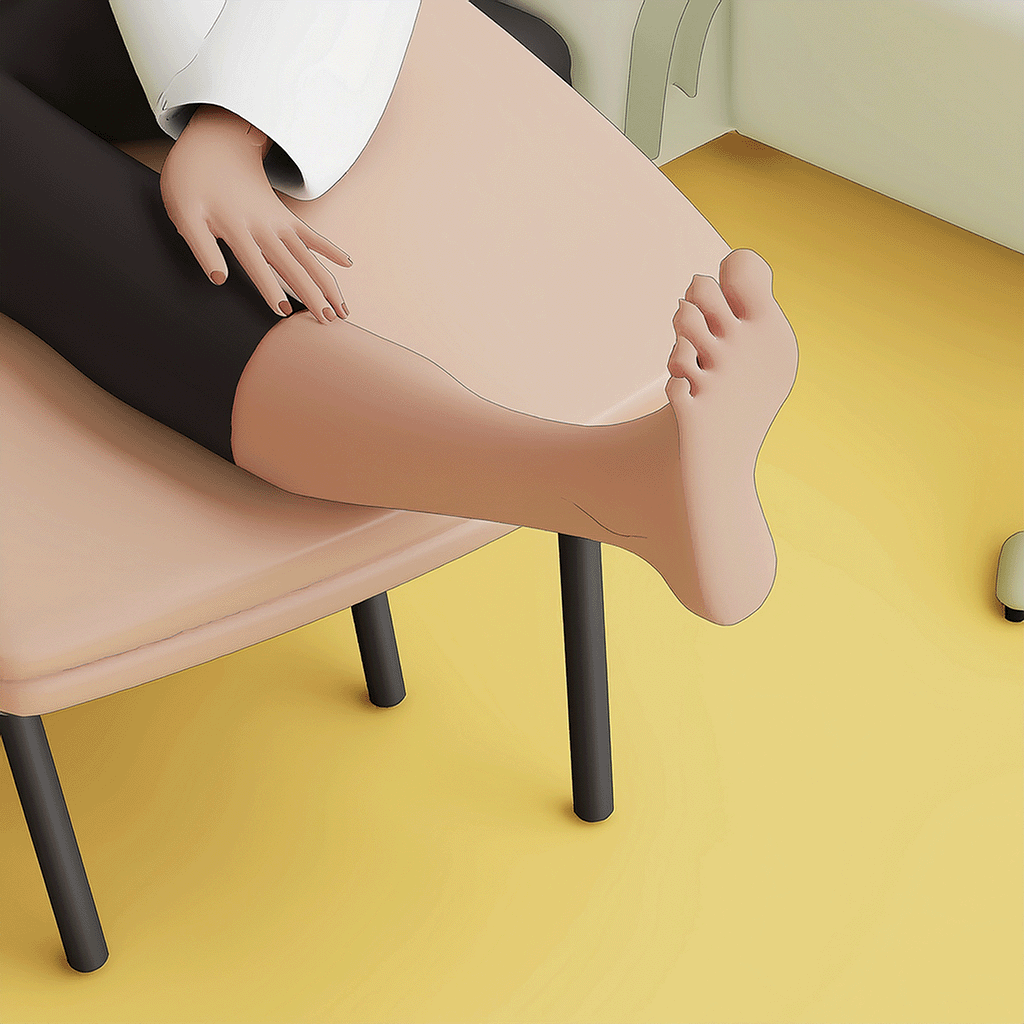
Patient sitting on a bed or table with toes up is not recommended as it produces less accurate heel area captures.
Patient sits on a bed or table with the foot hanging off the edge and toes pointing up for easier TrueDepth scanning.
Patient stands next to a chair and lifts one foot onto the chair with toes pointing down.
Patient lies face down on a bed or table with the foot hanging off the edge, toes pointing down.
Follow the correct scanning path for each position to ensure complete, accurate captures.
Begin scanning from the middle of the foot and move upwards toward the heel area.
From the heel, continue scanning by rotating down along the left side of the foot.
Return back up to the heel area to maintain tracking continuity.
From the heel, continue scanning by rotating down along the right side of the foot.
At every end of movement, stop and capture a key frame (when using colored scanning) to ensure good tracking and accurate color capture.
Begin scanning from the middle of the foot and move downwards toward the heel area.
From the heel, continue scanning by rotating up along the left side of the foot.
Return back down to the heel area to maintain tracking continuity.
From the heel, continue scanning by rotating up along the right side of the foot.
Stop and capture key frames at every end of movement for tracking and color accuracy.
Begin scanning from the middle of the foot and move downwards toward the heel area.
From the heel, continue scanning by rotating up along the left side of the foot.
Return back down to the heel area to maintain tracking continuity.
From the heel, continue scanning by rotating up along the right side of the foot.
At every end of movement, stop and capture a key frame (when using colored scanning) to ensure good tracking and accurate color capture.
FO scanning captures the foot area for creating custom foot orthoses (insoles). The scan covers the plantar surface, sides, and top of the foot.
Use the recommended standing (with chair) or lying down (face down) position with toes pointing down.
Focus the scan on the foot area — from the toes to just past the heel. Ensure complete coverage of the plantar surface, both sides, and the entire heel back area.
Use the toes-down scanning path: start at heel, Rotate medial, back to heel, then Rotate lateral. Capture key frames at each direction change.
AFO scanning captures a larger area including the foot and ankle/lower leg for custom ankle-foot orthoses. The scan extends higher up the leg compared to FO scanning.
Use the standing (with chair) or lying down (face down) position. Ensure the full ankle and lower leg are visible.
Scan from the toes through the foot and continue up past the ankle to the lower leg (mid-calf). Cover the full circumference at the ankle.
Make extra scanning passes around the ankle joint to capture the bony prominences (malleoli) accurately. These are critical landmarks for AFO fitting.
Taika3D Capture uses Structure SDK for 3D scanning and capturing detailed models. It supports multiple Structure Sensor generations and iOS devices with TrueDepth cameras.
Taika3D Capture uses the built-in TrueDepth camera on compatible Apple devices for 3D scanning — no external sensor required.
Structure Sensors work with a range of iPad models. Below are the recommended and compatible devices.
TrueDepth scanning uses the built-in depth camera — no external sensor required. Below are the compatible devices.
| Model | Year | Processor | Cable | TrueDepth |
|---|---|---|---|---|
| 13" iPad Pro (M5) | 2025 | M5 | USB-C (XL) | Yes |
| 11" iPad Pro (M5) | 2025 | M5 | USB-C | Yes |
| 13" iPad Pro (M4) | 2024 | M4 | USB-C (XL) | Yes |
| 11" iPad Pro (M4) | 2024 | M4 | USB-C | Yes |
| 12.9" iPad Pro (6th Gen) | 2022 | M2 | USB-C (XL) | Yes |
| 12.9" iPad Pro (5th Gen) | 2021 | M1 | USB-C (XL) | Yes |
| 12.9" iPad Pro (4th Gen) | 2020 | A12Z | USB-C (XL) | No |
| 11" iPad Pro (4th Gen) | 2022 | M2 | USB-C | Yes |
| 11" iPad Pro (3rd Gen) | 2021 | M1 | USB-C | Yes |
| 11" iPad Pro (2nd Gen) | 2020 | A12Z | USB-C | No |
| iPad (11th Gen) | 2025 | A16 | USB-C | No |
| 13" iPad Air (M3) | 2025 | M3 | USB-C (XL) | No |
| Model | Year | Processor | Cable | TrueDepth |
|---|---|---|---|---|
| iPad (10th Gen) | 2022 | A14 | USB-C | No |
| iPad (9th Gen) | 2021 | A13 | Lightning | No |
| 11" iPad Air (M3) | 2025 | M3 | USB-C | No |
| 13" iPad Air (M2) | 2024 | M2 | USB-C (XL) | No |
| 11" iPad Air (M2) | 2024 | M2 | USB-C | No |
| iPad Air (5th Gen) | 2022 | M1 | USB-C | No |
| iPad mini (7th Gen) | 2024 | A17 | USB-C | No |
| iPad mini (6th Gen) | 2021 | A15 | USB-C | No |
These iPads can scan using the built-in TrueDepth camera without a Structure Sensor attached.
| Model | Year | Processor | Also Sensor Compatible |
|---|---|---|---|
| 13" iPad Pro (M5) | 2025 | M5 | Yes |
| 11" iPad Pro (M5) | 2025 | M5 | Yes |
| 13" iPad Pro (M4) | 2024 | M4 | Yes |
| 11" iPad Pro (M4) | 2024 | M4 | Yes |
| 12.9" iPad Pro (6th Gen) | 2022 | M2 | Yes |
| 12.9" iPad Pro (5th Gen) | 2021 | M1 | Yes |
| 11" iPad Pro (4th Gen) | 2022 | M2 | Yes |
| 11" iPad Pro (3rd Gen) | 2021 | M1 | Yes |
iPhone support depends on device generation and scan quality. Newer devices are supported, while older models may work inconsistently or are not supported.
| Model | Status | Notes |
|---|---|---|
| iPhone 17e | Supported | Fully supported for TrueDepth scanning. |
| iPhone Air | Supported | Fully supported for TrueDepth scanning. |
| iPhone 17 Pro | Supported | Fully supported for TrueDepth scanning. |
| iPhone 17 | Supported | Fully supported for TrueDepth scanning. |
| iPhone 16e | Supported | Fully supported for TrueDepth scanning. |
| iPhone 16 Pro | Supported | Fully supported for TrueDepth scanning. |
| iPhone 16 | Supported | Fully supported for TrueDepth scanning. |
| iPhone 15 Pro | Supported | Fully supported for TrueDepth scanning. |
| iPhone 15 | Supported | Fully supported for TrueDepth scanning. |
| iPhone 14 Pro | Supported | Fully supported for TrueDepth scanning. |
| iPhone 14 | Supported | Fully supported for TrueDepth scanning. |
| iPhone 13 Pro | Supported | Fully supported for TrueDepth scanning. |
| iPhone 13 | Supported | Fully supported for TrueDepth scanning. |
| iPhone 12 Pro | Supported | Fully supported for TrueDepth scanning. |
| iPhone 12 | Supported | Fully supported for TrueDepth scanning. |
| iPhone 11 Pro | Supported | Fully supported for TrueDepth scanning. |
| iPhone 11 | Supported | Fully supported for TrueDepth scanning. |
| iPhone XR | Not supported | Might work, but there are no guarantees for good results. |
| iPhone XS | Not supported | Might work, but there are no guarantees for good results. |
| iPhone XS Max | Not supported | Might work, but there are no guarantees for good results. |
| iPhone X | Not supported | Might work, but there are no guarantees for good results. |
| iPhone SE (1st, 2nd, 3rd Gen) | Not supported |
Note: Older devices might work but are not recommended due to performance issues and potential compatibility problems. iPads with Lightning connectors cannot charge the Structure Sensor during use. USB-C devices are recommended when available. For the latest compatibility info, visit Structure Support.